


If your orchid has started to turn yellow, the leaves are drooping, and the roots are dark brown and soft, it's not time to mourn. In fact, there is a natural, almost miraculous way to completely revive it - without chemicals, without expensive preparations, just with what you already have at home. Save your orchid the natural way!
What can it solve? an orchid, which has yellow leaves? Orchids are considered delicate and demanding plants, but with proper care they can turn into real winners of the home greenhouse – with shiny leaves, healthy roots and an abundance of flowers. Below we present to you comprehensive 7-step natural process, with which you can bring your orchid back to life – from the first cut to the final fertilizer.
How to identify the problem and solve the rot – what will save the orchid?
When orchid leaves start to turn yellow, it is often a sign root rot, caused by overwatering, improper drainage or too much fertilizer. The plant begins to decay from the bottom up, which means that the first thing to do is inspect and clean the root system.
First, gently remove the orchid from its pot and remove any remaining substrate. Inspect the roots and use disinfected scissors to remove any brown, soft, mushy, or rottenHealthy roots are firm and light green or silver in color.
Save an orchid – the process from start to finish
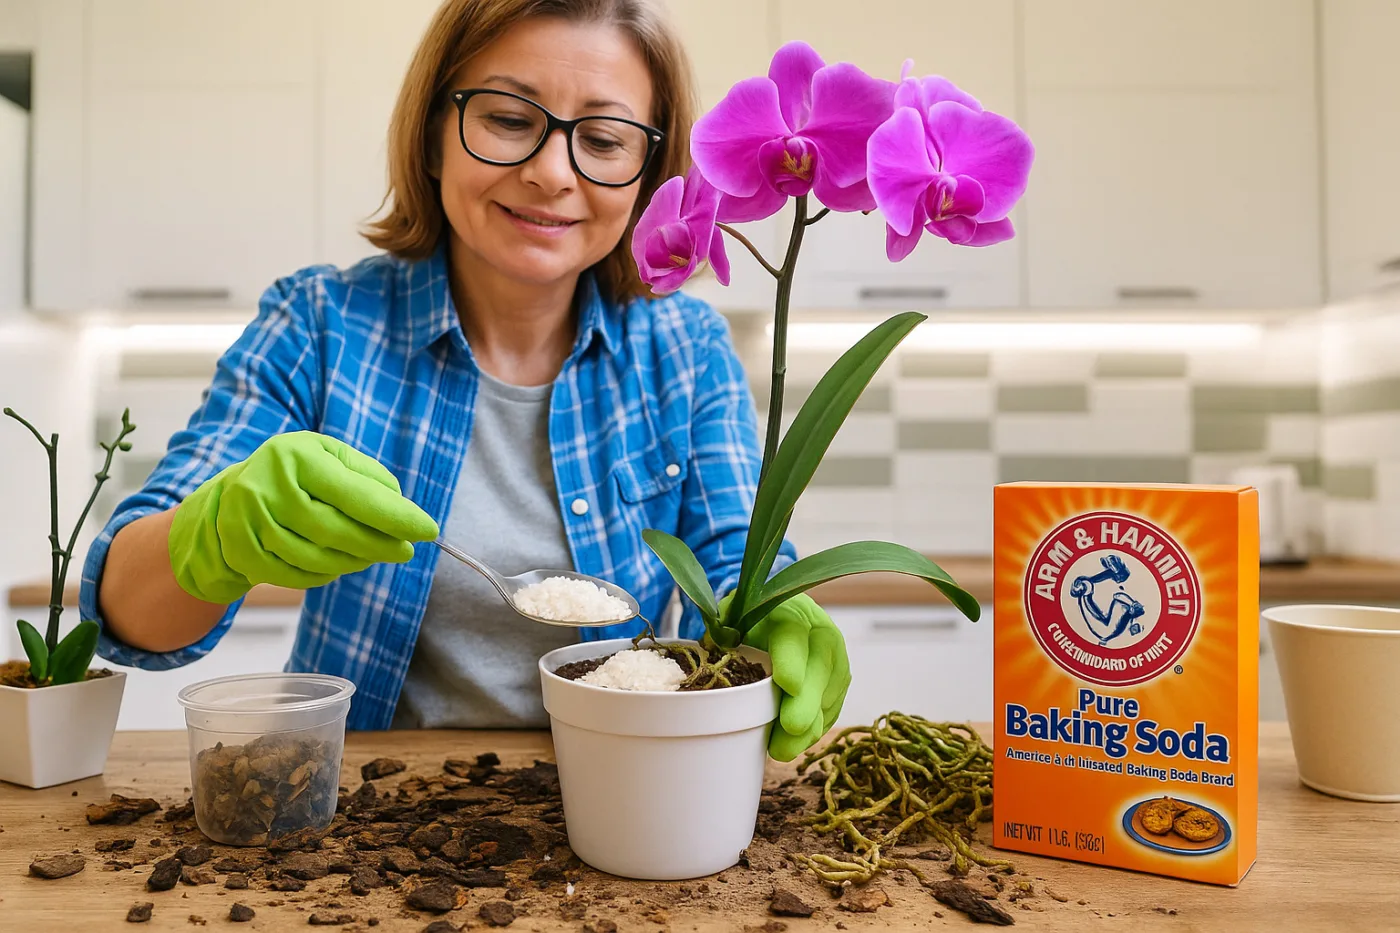
1. Natural disinfection: Baking soda as the first weapon
After pruning damaged roots, you must plant to disinfectto prevent the spread of bacteria and mold. Let's use a simple but effective natural antiseptic – baking soda.
Ingridients:
-
- 2 liters of water
- 1 teaspoon of baking soda
Process:
-
- Mix baking soda with water and stir well.
- Soak the orchid roots in this solution. 10 minutes.
- After watering the plant air dry and prepare for transplantation.
Soda works antibacterial and antifungal, while creating an environment that inhibits the return of rot and mold.
2. Transplant: Dry moss as a rescue medium
For further orchid restoration transplanted into dry, sterilized moss, which retains moisture without stagnation. This step is crucial to re-establishing a healthy environment. Gently anchor the orchid into the pot, making sure the moss hugs the roots nicely, then water only once a week, so much so that the moss is moist, not wet.
Covering the pot with air cover helps to retain moisture, without the risk of rotting. It is important to place the orchid in a bright place with direct indirect light, as direct sun can weaken an already vulnerable plant.
3. Two months of patience and the first signs of recovery
After approximately two months you will notice the first signs of recovery – new, white or green roots, stronger leaf rosettes, maybe even a new shoot. But if the leaves are still wilting a little, it means the plant needs additional nutrients.
4. Rice water – a natural growth enhancer
Once the roots are strong, it is time to feed the plant with a gentle but rich natural fertilizer. Rice water contains minerals, vitamins and amino acids, which promote growth and photosynthesis.
Ingridients:

-
- 2 liters of water
- 5 teaspoons of rice
Process:
-
- Cover the rice with water and let it soak. 30 minutes.
- Strain the rice and use the liquid for fertilizing.
How to use rice water for maximum effect
-
- Root watering: once every two weeks, pour rice water around the base of the plant.
- Leaf spraying: Spray on the top and bottom of the leaves for extra absorption.
- Deleting sheets: Use cotton wool soaked in rice water to remove dust and promote nutrient absorption.
What can you expect?
With regular care, your orchid will bloom in a few months. completely regenerated. She will gain strong, healthy roots, shiny green leaves and new flower shootsthat will delight for a long time to come.
Golden rule: Don't drown it!
The biggest mistake in orchid care is excessive wateringOrchids are used to a tropical environment with high humidity, not soggy soil. Therefore, the substrate should always be just slightly damp, never wet.