


Why not bring a touch of nature into your Easter celebration? Discover the joy of making your own vibrant Easter eggs using natural ingredients, without expensive chemical dyes. Immerse yourself in the world of homemade, eco-friendly egg dyes that not only save you money, but add a unique and healthy charm to your celebrations. We present to you natural dyes for dyeing Easter eggs.
Which ones are natural dyes for dyeing Easter eggs? Change your tradition decorations Easter eggs into an enchanting experience by embracing the beauty of natural dyes. Not only does this method offer a cost-effective alternative, but it also allows you to reconnect with the essence of the season. Share this wonderful activity with friends and family and create memories that are as vivid and lasting as the colors that make them you will achieve on your homemade Easter eggs. This year, let nature be your guide as you embark on a journey of creativity, sustainability and holiday cheer.
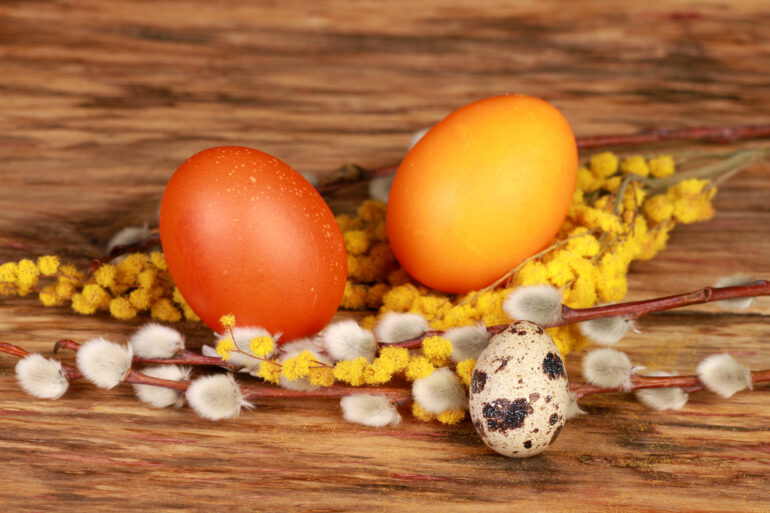
Cooking Easter eggs - natural dyes for dyeing Easter eggs
Mix 250 milliliters of water with two tablespoons of vinegar in a medium-sized saucepan and bring to a boil. Reduce the heat and add the natural ingredients below to create a unique egg dye. Let the mixture simmer for 30 minutes to develop the colors, then cool and strain the liquid before adding the eggs. Let the eggs soak for at least 30 minutes, or longer for more vibrant hues.
Pink Easter eggs - beetroot
To naturally dye Easter eggs pink using beetroot, follow the steps below. Beetroot is an excellent choice for this, as its strong natural dyes can give the eggs beautiful pink to dark red hues, depending on the soaking time.

Ingredients needed:
- 1-2 large red beets, diced (use more beets for more intense color)
- Water (enough to cover the eggs in the pot)
- White vinegar (1 tablespoon per cup of water)
- White chicken eggs (pre-boiled or raw, depending on your preference)
Steps:
- Preparation of beets: Wash the beetroot and cut it into small pieces. The larger the surface, the faster and more strongly the beet will emit its color.
- Cooking beets for dye: Place the sliced beets in a pot and add enough water to cover them completely. Add the white vinegar as this will help set the color on the eggshell. Bring to a boil, then reduce the heat and let it cook slowly for about 15 to 30 minutes, so that the dye is well extracted from the beets.
- Preparation of eggs: While the beets are cooking, prepare the eggs. If using raw eggs, hard-boil them and then refrigerate. If you are using pre-boiled eggs, make sure they are clean and chilled.
- Egg coloring: When the beets are sufficiently cooked and the water has a nice color, remove the pot from the heat. Allow the mixture to cool slightly, then dip the prepared eggs into it. The eggs should be completely submerged in the liquid.
- Soaking time: For light pink shades, leave the eggs in the dye for a shorter time, about 30 minutes to 1 hour. For darker and more intense pink to red shades, leave the eggs in the mixture for several hours or overnight. The more time the eggs spend in the dye, the more intense the color will be.
- Egg drying: When the desired shade of pink is reached, carefully remove the eggs from the liquid. Place them on a dry paper towel or drying rack to dry. Avoid wiping the eggs while drying to avoid smearing the paint.
Orange Easter Eggs - Yellow Onion
To naturally dye Easter eggs orange with yellow onion skins, follow the procedure below. Yellow onion skins are great for creating rich, warm orange and brown hues, which is surprisingly easy and produces beautiful results.
Ingredients needed:
- Peels from about 5 to 10 yellow onions (the amount depends on the number of eggs and the desired intensity of color)
- Water (enough to cover the eggs in the pot)
- White vinegar (1 tablespoon per cup of water)
- White chicken eggs (pre-boiled or raw, depending on your preference)
Steps:
- Collecting Shells: When you peel onions, save the brown outer skins. These shells are the key to creating the orange color on your Easter eggs.
- Preparation of shells and water: Put the yellow onion skins in a pot and add enough water to completely cover the eggs when you add them. Add the white vinegar as this will help the color adhere better to the eggshells.
- Cooking shells: Bring the mixture to a boil, then reduce the heat and let it simmer for about 30 minutes to 1 hour. The length of cooking will affect the depth and intensity of the color.
- Preparation of eggs: While the onion skins are cooking, prepare the eggs. If using raw eggs, boil them until hard and cool. If you are using pre-boiled eggs, make sure they are clean and chilled.
- Egg coloring: When the onion skin dye is ready, remove the skins from the water (you can use a colander), then cook or soak the eggs in this colored water. If you want to color the boiled eggs, add them to the hot water and cook for another 10 to 15 minutes. For more intense colors, leave the eggs in hot water until it cools, or even overnight.
- Egg drying: When the desired intensity of orange color is reached, carefully remove the eggs from the water. Place them on a dry paper towel or drying rack to dry.
Yellow Easter Eggs - Turmeric
Follow these simple steps to naturally dye Easter eggs yellow using turmeric. Turmeric is known for its strong coloring properties and can give eggs a vibrant yellow hue.

Ingredients needed:
- 2 to 3 tablespoons of turmeric powder (for a stronger yellow, you can add more)
- Water (enough to cover the eggs in the pot)
- White vinegar (1 tablespoon per cup of water)
- White chicken eggs (pre-boiled or raw, depending on your preference)
Steps:
- Preparation of dye: In a large pot, add the turmeric and enough water to submerge the eggs later. Add white vinegar to help the dye adhere better to the eggshells.
- Boiling: Bring the mixture to a boil. Once it boils, reduce the heat and let it simmer for about 10 to 15 minutes. This will allow the turmeric to fully express its color.
- Preparation of eggs: While the turmeric is cooking, prepare the eggs. If using raw eggs, hard-boil them and then refrigerate. If you are using pre-boiled eggs, make sure they are clean and chilled.
- Egg coloring: Once the dye is ready, you can optionally remove some of the turmeric with a strainer for a more even color, but it's not necessary. Then gently add the eggs to the hot turmeric water. You can move them a bit during the process for more even coloring.
- Soaking time: For a light yellow color, leave the eggs in the color mixture for a shorter time, about 10 to 30 minutes. For a more intense and deeper yellow color, leave the eggs to soak longer, for several hours or overnight. Adjust the soaking time according to the desired shade of yellow.
- Egg drying: When the desired shade of yellow is reached, carefully remove the eggs from the liquid. Place them on a dry paper towel or drying rack to dry. Avoid wiping the eggs while drying to avoid smearing the paint.
Blue Easter eggs - red cabbage
To naturally dye Easter eggs blue using red cabbage, follow these steps. Red cabbage is an excellent natural choice for creating blue hues, as it contains anthocyanins, which act as pH-sensitive natural dyes and can give eggs beautiful blue hues.

Ingredients needed:
- 1 medium head of red cabbage, roughly chopped
- Water (enough to cover the eggs in the pot)
- White vinegar (1 tablespoon per cup of water)
- White chicken eggs (pre-boiled or raw, depending on your preference)

Steps:
- Preparation of red cabbage: Wash the red cabbage and cut it into rough pieces. The larger the surface, the faster and stronger the cabbage will give its color.
- Cooking cabbage for dye: Place the sliced red cabbage in a large pot and add enough water to cover the eggs later. Bring to a boil and bring to a boil. Once it boils, reduce the heat and let it cook for about 30 minutes to 1 hour. The longer the cabbage is cooked, the stronger the color will be.
- Adding vinegar: After cooking the cabbage, add white vinegar to the water. Vinegar not only helps fix the color on the eggshell, but also enhances the intensity of the blue color.
- Preparation of eggs: While the cabbage is cooking, prepare the eggs. If using raw eggs, boil them until hard and cool. If you are using pre-boiled eggs, make sure they are clean and chilled.
- Egg coloring: When the dye is ready, remove the pieces of cabbage from the water (you can use a colander). Gently place the eggs in the hot water with the dye. You can move them a bit during the process for a more even color.
- Soaking time: For light blue shades, leave the eggs in the color mixture for a shorter time, about 30 minutes to 1 hour. For more intense and darker shades of blue, leave the eggs to soak for longer, maybe several hours or overnight. Adjust the soaking time according to the desired shade of blue.
- Egg drying: When the desired shade of blue is reached, carefully remove the eggs from the liquid. Place them on a dry paper towel or drying rack to dry. Avoid wiping the eggs while drying to avoid smearing the paint.
Purple Easter Eggs - Blueberries
To naturally dye Easter eggs purple using blueberries, follow the procedure below. Blueberries are an excellent natural source of dye that can give eggs a beautiful purple hue.

Ingredients needed:
- 1 to 2 cups blueberries (fresh or frozen, depending on availability)
- Water (enough to cover the eggs in the pot)
- White vinegar (1 tablespoon per cup of water)
- White chicken eggs (pre-boiled or raw, depending on your preference)
Steps:
- Preparation of blueberries: If you are using fresh blueberries, wash them well first. This step is not necessary for frozen blueberries. Put the blueberries in the pot.
- Cooking blueberries for dye: Add enough water to the blueberries to submerge the eggs later. Add white vinegar to help the dye adhere better to the eggshells. Bring to a boil, then reduce heat. Let it cook slowly for about 15 to 30 minutes.
- Preparation of eggs: While the blueberries are cooking, prepare the eggs. If using raw eggs, boil them until hard and cool. If you are using pre-boiled eggs, make sure they are clean and chilled.
- Egg coloring: When the dye is ready, mash the blueberries together with water to extract as much dye as possible. You can then strain the entire mixture through a fine mesh strainer or cheesecloth to remove any blueberry residue, but it's not necessary if you want to create interesting patterns on the eggs.
- Soaking eggs in dye: Gently dip the eggs into the prepared blueberry dye. For lighter shades of purple, let them soak for a shorter time, about 30 minutes to 1 hour. For deeper and more intense purple shades, you can leave them in the dye for several hours or overnight.
- Egg drying: Once the desired shade of purple is reached, carefully remove the eggs from the liquid and place them on a dry paper towel or drying rack to dry. Avoid wiping the eggs while drying to avoid smearing the paint.
Green Easter eggs - spinach, green tea
To dye Easter eggs the natural way, using ingredients commonly found at home, the green color can be a bit more challenging, as getting the green color naturally requires a little more creativity. One way to achieve a green color is to use spinach leaves or green tea. Below is a description of the process for naturally dyeing Easter eggs using spinach leaves, which will produce a green color.

Ingredients needed:
- Fresh spinach leaves (a large handful or more, depending on the desired intensity of color)
- Water (enough to cover the eggs in the pot)
- White chicken eggs (pre-boiled or raw, depending on the desired coloring method)
- An acid such as white vinegar (about 1 tablespoon) to help set the color on the eggshell
Steps:
- Preparation of spinach: First, wash the spinach leaves well to remove any impurities.
- Cooking for color extract: Place the spinach leaves in a pot and add enough water to cover them completely. Bring to a boil, then reduce the heat and simmer gently for about 15 to 30 minutes. The longer you cook, the more intense the color will be.
- Preparation of eggs: While the spinach is cooking, prepare the eggs. If using raw eggs, first boil them gently until hard. If you chose pre-boiled eggs, skip this step.
- Adding vinegar: When the spinach extract is ready, remove the leaves and add white vinegar to the water. The vinegar will help the paint adhere better to the eggshells.
- Egg coloring: Gently add the eggs to the hot water with the spinach. Let them soak until the desired intensity of green color is reached. Leave them for a shorter time for a lighter green, and longer for a darker green.
- Egg drying: When the desired color is reached, carefully remove the eggs from the water and place them on a dry paper towel or drying rack to dry.
Experiment with combinations of natural ingredients for custom shades and effects. Enhance the dyeing process by using white or brown eggs for varied color results.

